
How to Install Window Blinds: A Simple Guide
- Blindsmart im
- Nov 8
- 16 min read
Right, let's get you set up for a flawless blind installation. Before you pick up a single tool, there are a few simple but crucial things to do first. It all comes down to gathering your gear, giving the new blinds a thorough once-over, and prepping your workspace before a single hole is drilled. Trust me, getting this part right is the secret to a smooth, headache-free fitting.
Your Pre-Installation Game Plan
Don't even think about drilling yet. A solid pre-installation routine is what separates a professional-looking finish from a DIY disaster. So many people rush this stage and end up making frustrating mistakes that could have been easily avoided. Think of this as laying the foundation—get it right, and the rest of the job will be a breeze. A few minutes of prep now will save you a world of pain later.
First things first, get those new blinds unboxed as soon as you can. Lay everything out on a clean, flat surface—the floor is fine, but pop a blanket down to prevent any scratches. Now, grab the parts list from the instructions and carefully check that everything is there. Have you got all the brackets, screws, and other bits and bobs? Is the blind itself free from any dinks or defects from its journey to you? Spotting a missing bracket now is a minor inconvenience; finding out when you're halfway up a ladder is a genuine problem.
Assembling Your Essential Toolkit
Once you've confirmed you have everything for the blinds, it's time to gather your own equipment. Having all your tools within arm's reach means no more mad dashes to the garage mid-job. The type of wall you have is going to be the biggest factor here, especially when it comes to your drill, bits, and fixings.
A classic mistake is using the wrong wall plugs and screws. For example, trying to put a standard screw into plasterboard without the right hollow wall anchor is a recipe for a wobbly blind. On the flip side, you'll get absolutely nowhere trying to drill into solid brick without a masonry bit and a drill with a hammer function.
Insider Tip: Always drill a small pilot hole first. This little trick confirms what you're drilling into and stops the bigger drill bit from ‘wandering’ off course. The result is a much cleaner, more accurate hole for your bracket screws.
To make sure you're ready to go, here’s a quick rundown of the tools you'll almost certainly need.
Your Essential Blind Installation Toolkit
This handy table breaks down exactly what you'll need to have on hand for a successful installation.
Tool/Material | What It's For | Insider Tip |
|---|---|---|
Tape Measure | Double-checking window measurements before drilling. | A metal, locking tape measure is far more accurate than a fabric one. |
Pencil | Marking bracket positions on the wall or window frame. | Use a sharp pencil for fine, precise lines that are easy to see. |
Spirit Level | Ensuring brackets are perfectly horizontal. | A 24-inch level is ideal for most windows to guarantee accuracy. |
Drill | Creating holes for screws. | A combi drill works well for both wood and masonry. |
Drill Bits | The right bit for your wall (wood, masonry, plasterboard). | For masonry, a hammer drill setting makes the job much quicker. |
Screwdriver | Securing the brackets with the provided screws. | An electric screwdriver saves time and effort, especially with many brackets. |
Step Ladder | Safely reaching the top of the window. | Ensure it's stable and placed on a level surface before you climb. |
Having these items ready will make the whole process much more efficient.
Creating a Safe and Efficient Workspace
Last but not least, sort out the area around the window. Move furniture, plants, and any ornaments well out of the way so you have plenty of room to manoeuvre. It’s also a great idea to lay a dust sheet or an old blanket on the floor to catch the inevitable dust and debris from drilling. It makes the final clean-up so much faster.
This is especially critical when you're tackling big, heavy blinds. For instance, our guide on choosing the best blinds for large windows explains how these larger treatments demand more careful handling. A clear, open space prevents you from accidentally damaging the blinds or your belongings and lets you work safely with your tools and ladder.
Getting Your Measurements Spot On
Getting your measurements right is the absolute foundation of a great blind installation. I’ve seen it countless times – beautiful, high-quality blinds that just don't look right because the measurements were off by a few millimetres. This isn't a step for "close enough"; it’s about being precise so your new blinds fit perfectly and work smoothly from day one.
First things first, you need to decide where the blinds will live. Will they sit neatly inside the window recess, or will they hang on the wall outside of it? Your answer changes how you measure completely.
Inside Mount (Recess Fit): This is where the blind fits snugly within the window frame. It offers a clean, integrated look that’s really popular in modern homes.
Outside Mount (Exact Fit): Here, the blind is mounted to the wall or trim outside the recess, overlapping the opening. This is a brilliant trick for blocking more light or covering up a less-than-perfect window frame.
Once you’ve made that call, it’s time to grab a metal tape measure and get to the most important part of the job.
Measuring for an Inside Mount
With a recess fit, precision is key. You're fitting the blind into a fixed space, so there's no wiggle room. It’s a common misconception that window frames are perfectly square, especially in older houses. What looks straight to the eye can easily be a few millimetres wider at the top than the bottom.
That’s exactly why you need to always take three measurements for both the width and the height.
Width: Measure across the top, middle, and bottom of the inside of the window frame.
Height: Measure the vertical drop on the left, in the centre, and on the right.
Always use the smallest of your three width measurements and the smallest of your three height measurements. This is the golden rule. It ensures your blind has clearance and won’t scrape or catch against the frame. A common mistake is to use the largest measurement, which almost always results in a blind that's too tight to operate properly.
When you order, you just provide these exact, smallest recess dimensions. The manufacturer will then make their own small deductions (usually about 1cm from the width) to account for the brackets and mechanism, guaranteeing a perfect operational fit.
Measuring for an Outside Mount
When you choose an outside mount, you've got a bit more flexibility, but the aim is still to achieve a balanced, professional finish. For this style, you’re measuring the final size you want the blind to be, overlap included.
The goal is to make sure the blind extends past the window opening on all sides. This gives you better light control and privacy. A good rule of thumb is to add at least 7cm to 10cm to both the width and the height of the actual window opening. This crucial overlap helps to minimise that sliver of light that can sneak in around the edges, sometimes called the 'halo effect'.
For the width: Measure the full width of your window, including the trim if you have it, then add a minimum of 7cm to each side for the overlap.
For the height: Decide where you want the top of the blind to sit (usually 7-10cm above the frame) and measure from that point down to where you want the fabric to end (typically just below the windowsill).
This isn't just about reading a tape measure; it’s about picturing how the blind will frame your window. For a more detailed walkthrough, especially if you're dealing with a tricky bay window or a door, our comprehensive guide on how to measure windows for blinds a perfect fit every time has some extra insider tips.
Before you even think about picking up a drill, do a quick sanity check. Unpack the blinds and hold them up against your measurements. Taking a moment to unpack everything, check you have all the parts, and lay out your tools will make the whole installation process go much more smoothly.

This simple prep work is half the battle. Getting these initial steps right is the best way to avoid frustrating mistakes and ensure you have everything you need close to hand when you start the physical installation.
Mounting Brackets with Total Precision
Now that you've got your measurements sorted, it’s time to fit the brackets—the foundation of your new window blinds. These small components do all the heavy lifting, so getting their placement spot-on is non-negotiable. Think of them as anchors; if they aren't right, nothing else will be.
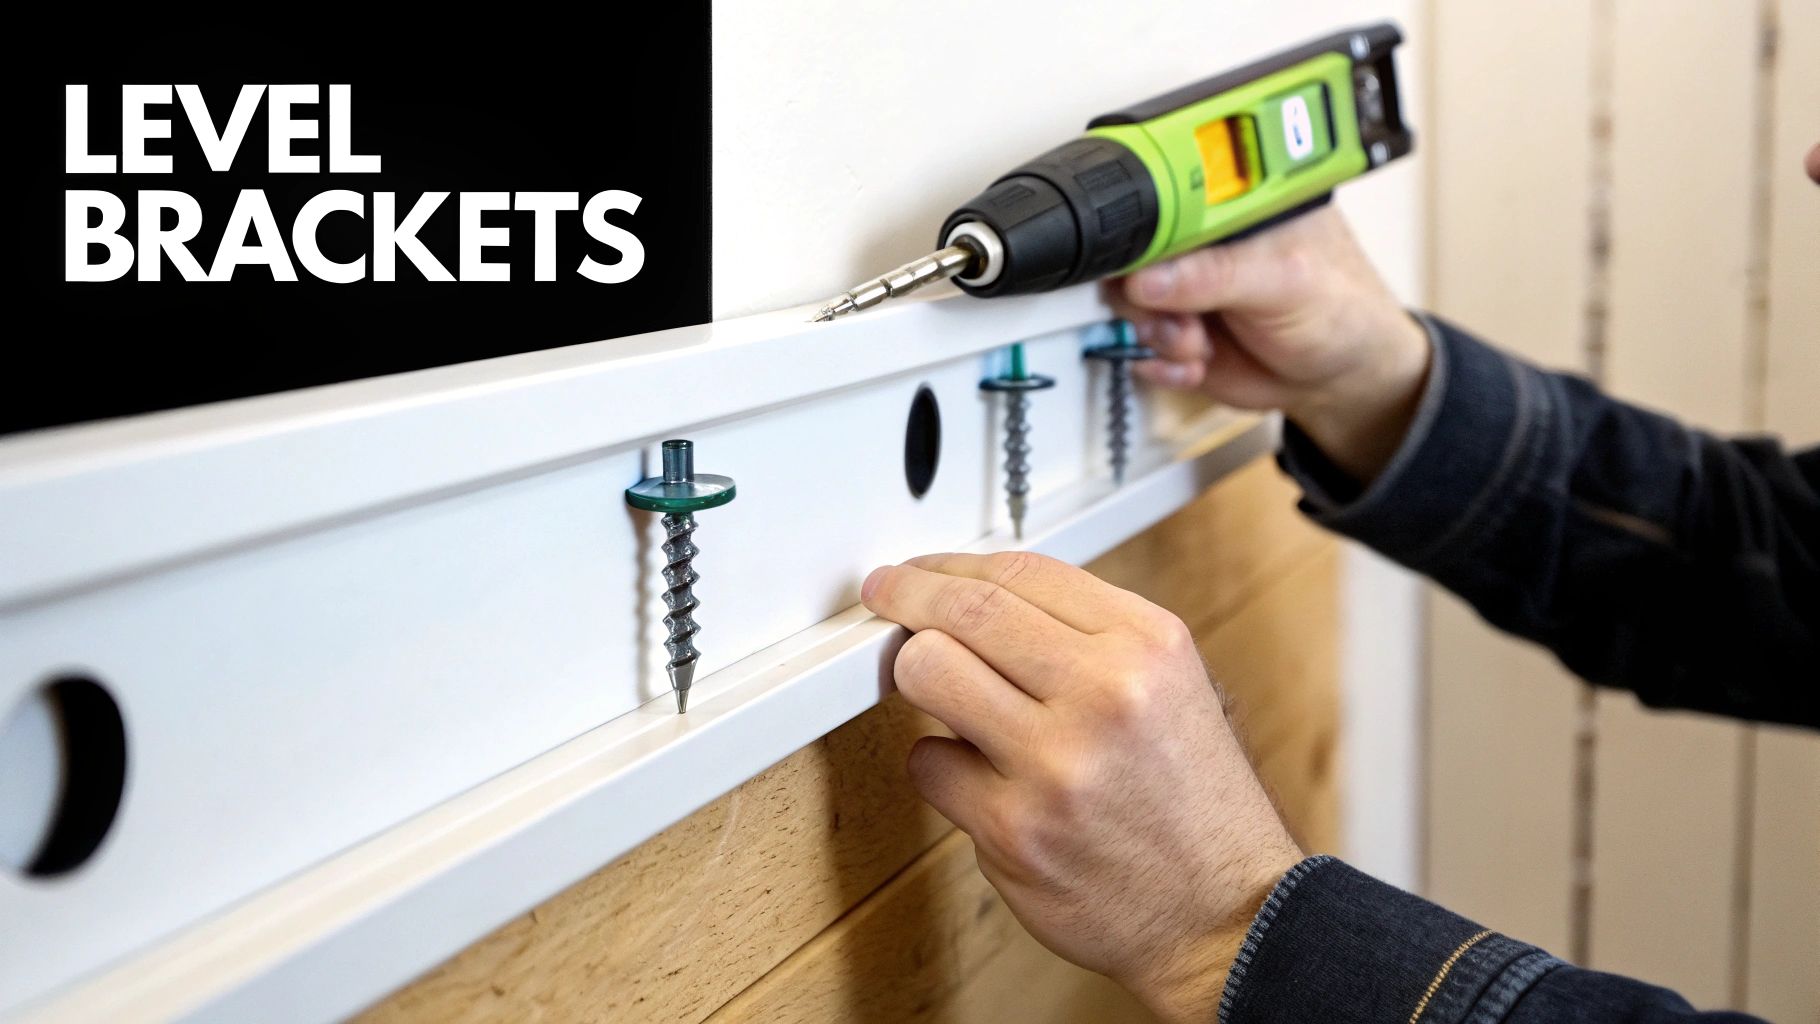
First things first, decide exactly where they need to go. Your blind's instruction manual will have specific guidance, but a good rule of thumb is to place one bracket about 5-7cm in from each end of the headrail. If you have a centre support bracket, that needs to be positioned squarely in the middle.
Using your pencil, hold a bracket in position and lightly mark through the screw holes onto the window frame or wall. You don't need to press hard; a clear, fine mark is all you're after.
Achieving a Perfectly Level Fit
This is where your spirit level proves its worth. After marking your first bracket, use the level to extend a perfectly straight line across to where the second bracket will sit. This one simple action guarantees your blind won't hang crooked—a classic and very obvious DIY mistake.
Hold the second bracket against this guideline and mark its screw holes. If you're fitting a wider blind with a central bracket, use the level again to ensure it sits at the exact same height as the two end brackets.
A common pitfall I see is people measuring down from the top of the window recess on both sides. In older homes especially, the recess itself might not be level. Relying on it as a guide will lead to a wonky installation. A spirit level measures true horizontal, regardless of the surrounding frame.
Drilling and Fixing for Your Wall Type
Now for the moment of truth: drilling the holes. How you approach this depends entirely on the material you're drilling into. Getting this right is crucial for ensuring your brackets are anchored securely enough to support the blind's weight.
Wood: For wooden frames, a small pilot hole is all you need. Use a drill bit that’s slightly smaller than your screw's diameter. This prevents the wood from splitting when you drive the screw in.
Plasterboard: This is a hollow wall type, so it needs special fixings. Never screw directly into plasterboard. You'll need a hollow wall anchor, like a spring toggle or a self-drive plasterboard plug, to get a secure grip.
Brick or Masonry: For this, you’ll need a hammer drill and a masonry bit. Drill a hole to the correct depth for your wall plug, tap the plug in so it's flush with the wall, and then you're ready to screw the bracket into it.
Once your holes are prepped, fix the brackets firmly in place with your screwdriver. Give them a little wiggle to make sure they're tight and don't move. This secure foundation is vital, particularly as the UK window covering market sees a rise in heavier, more functional blinds. The market was valued at around USD 1.45 billion in 2024, with growth driven by demand for weightier energy-efficient and UV-resistant materials. You can find more details in this in-depth market analysis on SphericalInsights.com.
Final Checks Before Fitting the Blind
Before you get excited and clip the blind into place, do one last quick check. Hold the headrail up to the brackets. Does it look like it will snap in easily? Are the brackets aligned correctly with the mechanisms inside the headrail?
Taking a moment for this final verification can save you a lot of hassle later. The process for Venetian blinds, for example, can be slightly different from roller blinds. For specific tips on that style, you can read our guide on how to install Venetian blinds a practical DIY guide.
With your brackets now perfectly level and securely fastened, you've completed the most critical part of the physical installation. You're ready for the final step.
Fitting the Blinds and Adding the Final Flourishes
Right, the brackets are up and solid. This is the moment it all comes together – the most satisfying part of the job, where a bit of plastic and fabric finally becomes your new window blind. It's time to get it fitted.
Carefully lift the headrail and get ready to pop it into the brackets you've just installed.
Most blind systems are designed to just click satisfyingly into place. The trick is to hook the front of the headrail into the front lip of the bracket first. Then, pivot the back edge upwards and push firmly until you hear a solid "click". That's the sound you're listening for – it tells you the mechanism is locked in. If you're working with a particularly wide blind, I find it helps to click the middle bracket in first before moving to the ends.
Before you do anything else, give the headrail a gentle but firm tug downwards. You want to be certain it’s securely seated in every single bracket. It’s a quick, two-second check that could save a lot of hassle later.
A Quick Test Run
Don't get ahead of yourself and start adding the decorative bits just yet. First, you need to make sure everything is working as it should. Gently lower the blind all the way to the sill, and then raise it back up to the top. Pay attention to the movement – is it smooth, or does it catch and stutter? If you've got Venetian or vertical blinds, test the tilt mechanism too, making sure the slats open and close in unison.
It’s not uncommon for a blind to feel a bit stiff or hang slightly askew on the first go. Don't worry, this is usually a simple fix.
Hanging a bit wonky? The cords in the ladder system can easily get twisted when you're taking the blind out of its packaging. Just take a moment to gently straighten them out.
Feeling stiff? Sometimes a new mechanism just needs to settle in. Running the blind up and down a few times is often all it takes to get things moving freely.
Scraping the window frame? This means the blind isn't perfectly centred. You might need to loosen the bracket screws slightly and nudge the whole headrail a tiny bit left or right to give it clearance.
Taking a minute to sort these little niggles now will ensure your blinds operate flawlessly for years to come.
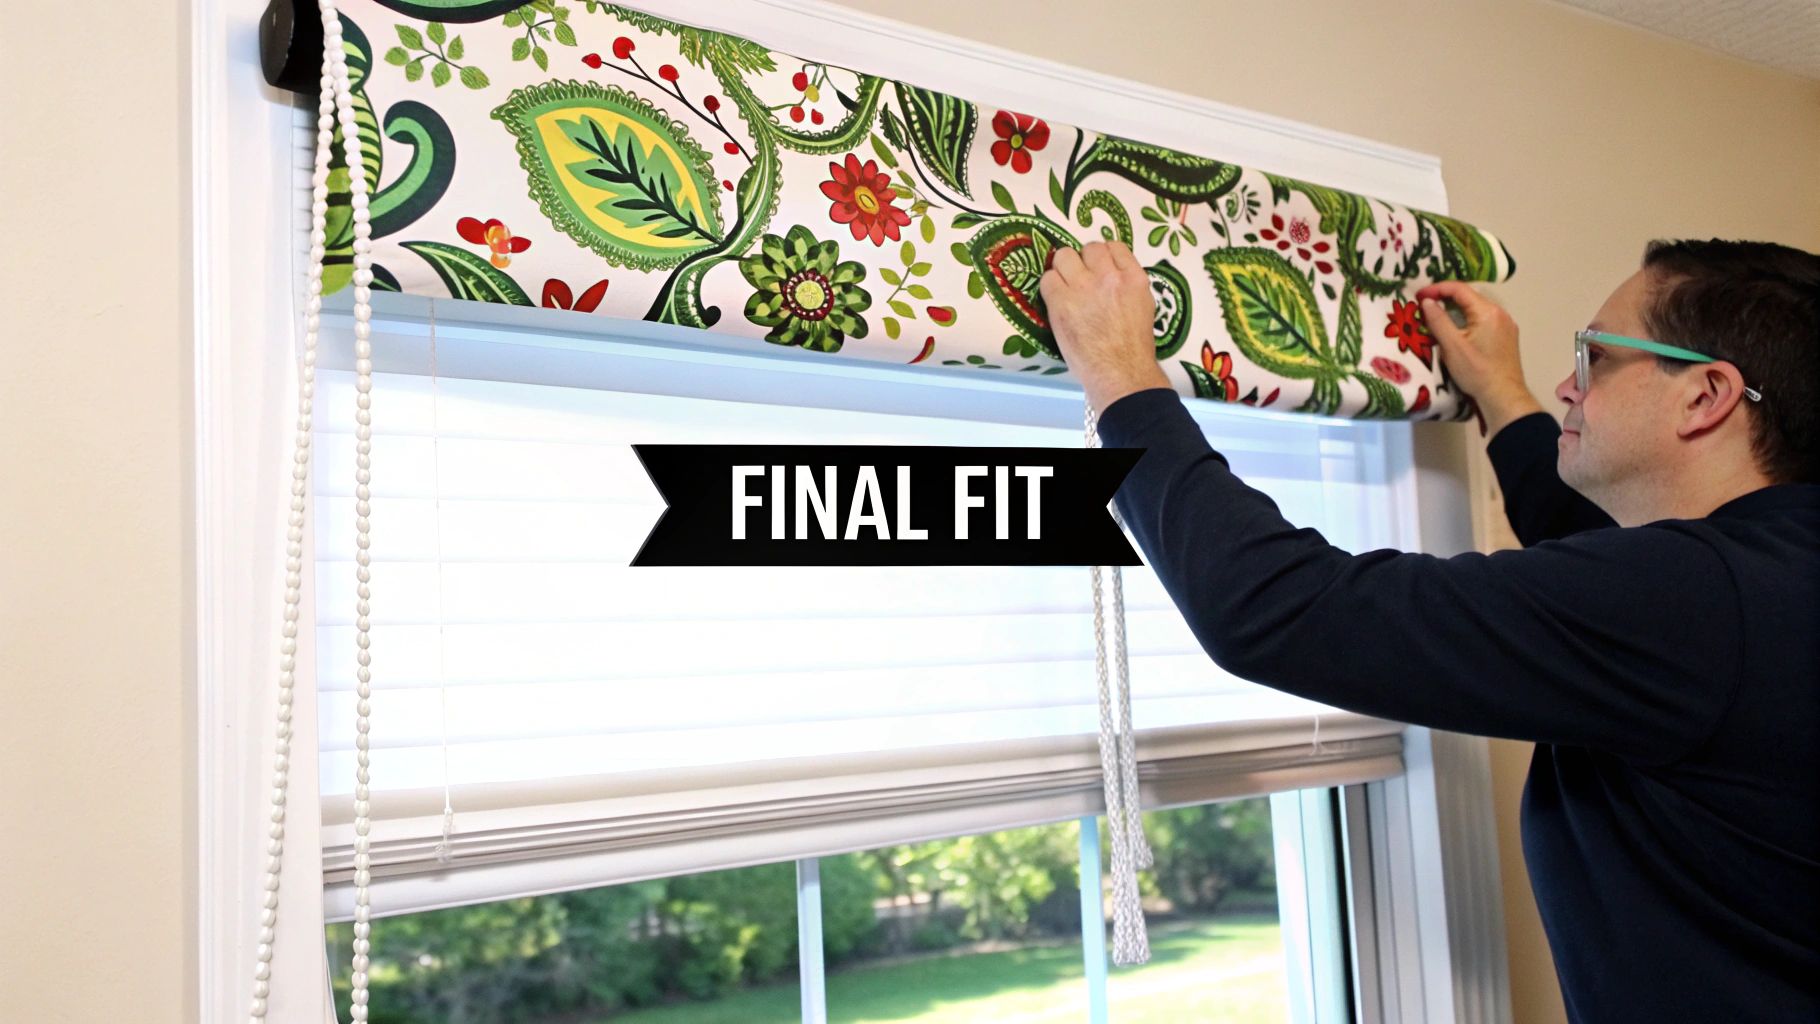
Adding That Professional Finish
These are the final details that separate a decent DIY job from a truly professional one. These last steps are all about creating a polished look and, most importantly, making sure your blinds are safe and compliant with UK regulations.
First, let's get the valance or pelmet fitted. This is the decorative strip that hides the headrail and brackets, giving your window a much cleaner, more integrated look. Most valances simply clip onto the front of the headrail. I always start at one end and work my way along, gently pressing the clips into place. Step back and check it's sitting straight before you call it done.
Child safety isn't an optional extra; it's a legal requirement here in the UK. Any blind with a free-hanging cord or chain must have a safety device fitted to prevent the risk of strangulation. Never, ever skip this step.
Next up is the cord cleat or tensioner. This crucial device keeps operating cords and chains taut and safely out of the reach of children and pets. Find a spot on the wall or frame where the chain will be held tight when the blind is fully down. Mark your screw holes, drill your pilot holes, and fix it securely. This is a non-negotiable part of how to install window blinds safely.
Finally, you can attach any decorative pulls or wands. These usually just screw or hook into place and are the last piece of the puzzle. It’s these touches that contribute to the aesthetics, functionality, and safety – the hallmarks of a job well done. This attention to detail is vital across the European window blinds market, which was valued at around US$8.3 billion in 2024. In the UK, proper fitting also ties into building regulations like Part L, where well-installed blinds can contribute to thermal efficiency and lead to real energy savings. You can dig deeper into these market insights over at TransparencyMarketResearch.com.
Tackling Common Installation Problems
Even with the most careful planning, sometimes things just don’t go perfectly. A slightly wonky wall or a misread measurement can throw a spanner in the works. But don't panic—most installation hiccups are surprisingly easy to fix without having to start from scratch.
This is your go-to guide for troubleshooting the little issues that can pop up when you're fitting your own window blinds. Instead of feeling frustrated, you'll have the know-how to make quick adjustments and still get that flawless, professional finish you're after.
What to Do If Your Blind Fits Too Tightly
You've measured twice, but your blind is still a bit too snug in the recess. It scrapes the sides as it moves or, in the worst case, won't fit between the brackets at all. Before you reach for the sandpaper, take a breath.
First, take a closer look at your brackets. Are they mounted as far out to the edges of the recess as possible? Sometimes, just re-fixing a bracket a few millimetres further out is all it takes to create the necessary clearance for the headrail. It's a simple fix that often solves the problem instantly.
If it's the fabric itself that's catching, particularly with roller blinds, there might be an even simpler solution. Some roller blinds allow for a tiny amount of side-to-side adjustment in their brackets. Try loosening the screws, shifting the barrel ever so slightly, and then tightening them back up. This can often provide that extra sliver of space needed for smooth operation.
Dealing with a Misplaced Drill Hole
It happens to the best of us. You’ve drilled a hole, only to realise it’s slightly off-level or in the wrong spot entirely. It's a frustrating moment, but it's definitely not a disaster. The key is to fix it properly so it doesn't compromise the final, secure fit of your blind.
The solution is pretty straightforward:
Fill the old hole. Use a small amount of wood filler for window frames or a general-purpose filler for walls. Overfill it slightly, as filler tends to shrink a little as it dries.
Smooth it over. Once the filler has completely dried, lightly sand the area until it’s perfectly flush with the surrounding surface.
Touch up the paint. A quick dab of matching paint will make the old hole completely invisible.
A word of warning: don't try to reuse a hole that's too close to your new, correct position. Drilling a fresh hole just a few millimetres away can create a weak spot in the material, especially in wood or plasterboard. A proper fill provides a solid foundation for your new drilling point.
Fixing a Blind That Hangs Crooked
You’ve stepped back to admire your handiwork, and one side is noticeably lower than the other. This is one of the most common issues, and thankfully, it's usually the easiest to fix. Nine times out of ten, the problem isn't the blind itself but the cords inside it.
During packaging and transport, the internal 'ladder' cords on Venetian or Roman blinds can get twisted or settle unevenly. To fix this, simply lower the blind completely. Then, give the bottom bar a gentle tug and a little shake to help the cords untangle and re-settle into their correct position.
If that doesn't sort it, get your spirit level back out and place it on the headrail. If the headrail itself isn't level, you'll need to adjust one of your brackets slightly.
When Your Blind Won't Retract Smoothly
A brand-new blind that stutters, sticks, or refuses to go up is incredibly annoying. This is most common with spring-loaded roller blinds and is typically caused by incorrect tension in the mechanism. The fix is often surprisingly simple.
For a roller blind: Most have an adjustment wheel or pin on one end. To increase tension (if it won’t retract), roll the blind up by hand and then pop it out of its brackets. Roll it by hand a few more turns in the same direction and put it back in. To decrease tension (if it shoots up too fast), take it out of the brackets and unroll it a few turns. It’s a process of small adjustments to find that perfect balance.
Don't let a small hiccup derail your project. A little patience and these simple fixes will solve most common problems, giving you the confidence to get the job done right.
A Few Final Questions About Fitting Your Blinds
Even with the best guide in hand, a few questions can pop up when you're faced with your specific window. That's completely normal. Every home has its quirks, from tricky wall types to unusual window frames.
Here are the answers to some of the most common queries we get from DIY installers. Think of it as a bit of expert advice to get you over those final hurdles and achieve a truly professional finish.
Can I Cut My Blinds Down to Size?
This is a classic question, and the honest answer is: it really depends on the type of blind you've bought.
Aluminium or PVC Venetian Blinds: In most cases, yes. It's a manageable job if you're patient. You'll need a special slat cutter to get a clean edge on the slats, plus a fine-toothed hacksaw for the headrail. Just take your time.
Wooden Blinds: This is a much tougher job to get right. Trying to use a standard hacksaw on wooden slats or a headrail often leads to splintering and a messy finish. Really, the only tool for the job is a power mitre saw with a fine-toothed blade, which most people don't have lying around.
Roller and Roman Blinds: I'd strongly advise against trying to cut these yourself. The fabric frays very easily, and getting the roller tube perfectly straight is incredibly difficult without specialist equipment. You'll almost certainly end up with a blind that doesn't hang or roll correctly.
My two cents? If you want a perfect finish, always go for made-to-measure. While trimming some types of blinds is possible, nothing beats the clean, factory-perfect edge of a blind made specifically for your window.
How Do I Fit Blinds to uPVC Windows?
Drilling into uPVC frames makes many people nervous, and for good reason. A misplaced hole can damage the frame's internal structure or even void the window's warranty.
The number one rule is to never drill into the main outer part of the frame, especially along the bottom where the drainage channels are. If you absolutely have to drill, stick to the removable glazing beads that hold the glass in.
A far better option, however, is to use "no-drill" brackets. These are brilliant little clips that slide between the glass and the rubber gasket, giving you a solid fixing point without making a single hole. They’re ideal for lighter blinds like pleated or aluminium Venetians.
What’s Different About Installing Motorised Blinds?
With home automation becoming the norm, motorised and smart blinds are more popular than ever. In fact, blinds make up 62.42% of the UK window coverings market revenue in 2024, and the sector is set to grow by 10.2% annually through to 2030, largely thanks to these clever systems. You can read more on these UK market trends at GrandViewResearch.com.
When fitting them, there are a couple of extra things to think about:
Power: Is it a battery-operated model or does it need wiring into the mains? Battery packs are the easiest for DIY, as they usually just clip discreetly behind the headrail.
Wiring: Hardwired blinds give a seamless look but are a job for a professional. Unless you're a qualified electrician, don't attempt this yourself.
Programming: Once the blind is up, you’ll need to pair the remote and set the upper and lower stopping points. The instructions are usually pretty clear, making this a simple final step.
Do I Really Need Special Fixings for Plasterboard?
Yes, absolutely. This is a crucial safety point. Your standard screws and wall plugs just won't cut it in plasterboard; they’ll pull straight out under the weight of the blind. It's a recipe for disaster.
You must use proper plasterboard fixings. Self-drive metal anchors are a great choice as they screw directly into the board and create a firm hold. For heavier blinds, spring toggles are even better – they pop open behind the board, creating an incredibly strong anchor point. Always check the weight rating on the fixings to make sure they can handle your blinds. This isn't a corner you want to cut.
At Blindsmart, we believe that getting the perfect blinds should be an easy and enjoyable process. If you'd rather leave it to the experts for a guaranteed flawless finish, our team on the Isle of Man is here to handle everything from measuring to fitting. Take a look at our stunning made-to-measure collections at https://www.blindsmart-im.co.uk.